EDC Lite Fitting Instructions
Assembly time, approximately 10-15 minutes. Difficulty: Easy.
Things You Will Need
- OneUp EDC Lite Kit.
- 4mm Hex (Long Handle Required)
- 5mm Hex
- Mallet or Hammer
- Ruler or Tape Measure

The EDC Lite Kit contains the following pieces:
- OneUp EDC Multi-Tool
- OneUp EDC Lite Carrier
- OneUp EDC Lite Tool Clip
- Star Nut Setter Bolt
- EDC Lite Bolt

Your EDC Lite kit contains everything you need to install and store the EDC Multi Tool in your stem/steerer tube and includes the 9 function EDC Multi Tool. The EDC Lite Plastics kit includes everything except the multi tool.
We recommend that you read ALL steps of the fitting instructions before you begin.
If you are installing an EDC Lite on an already-assembled bike you do not need to loosen your stem/headset.
If you are building a bike you can still follow all the steps below, but you will need to tighten your headset at the end of the installation process.
FITTING INSTRUCTIONS
STEP 1: ENSURE YOUR FORK IS COMPATIBLE - VERY IMPORTANT
Incompatible forks: Giant Overdrive 2 Forks. Cannondale Lefty Forks. Carbon Steerers
STEERER TUBE INNER DIAMETER
The inner diameter of your steerer tube must be at least 24.1mm. We are not currently aware of any tapered steerer tubes that do not meet this requirement. If fitting unsure, you can check this by inserting the tip of the EDC Lite into the steerer tube above the star nut BEFORE lowering the star nut position.
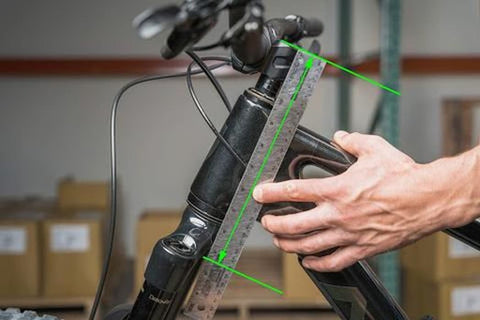
STEERER TUBE LENGTH
Most forks are compatible, except for a small number of forks with very short steerer tubes. For the following cases your fork steerer tube length must meet the minimum length requirement.
- Fox except Fox 38 : 190mm min
- Fox 38 : 210mm min
- ROCKSHOX Forks = 210mm min
Measure from the underside of your fork crown to the top of your spacer stack, or top of your stem if you are not running any spacers above your stem.
STEP 2 : REMOVE YOUR TOP CAP BOLT, LEAVE YOUR TOP CAP IN PLACE

STEP 3 : SCREW IN THE STAR NUT SETTER BOLT (LONG BOLT) 10 FULL TURNS.
Do not screw in the Setter Bolt until it bottoms out, as this will lead to your Star nut not being set deep enough to install EDC Lite


STEP 4: HAMMER THE STAR NUT SETTER BOLT DOWN, UNTIL THE TOP OF THE BOLT IS FLUSH WITH YOUR TOP CAP COUNTERBORE.
Be careful to ensure that the bolt stays straight (vertical) as you hammer it down. Tap the side of the bolt if you need to straighten it.

STEP 5: REMOVE YOUR STAR NUT SETTER BOLT AND TOP CAP

STEP 6: INSERT THE EDC LITE TOP CAP INTO YOUR STEERER TUBE AND ALIGN THE TOOL SLOT TO YOUR PREFERRED DIRECTION
The EDC Carrier should easily insert into your steerer tube by hand. If a tight fit, DO NOT hammer the carrier in.
Ensure your steerer tube is burr free.
If the carrier has a tight fit, first try loosening your stem pinch bolts and reassembling. Be sure to re-tighten your stem bolts after installing.
The tool slot is the rectangular hole in the EDC Lite Carrier which the EDC Multi-Tool fits into. The OneUp logo on the Tool Clip is horizontal when the teardrop is pointing to the driveside.


STEP 7: INSTALL THE EDC LITE BOLT & TIGHTEN USING A LONG HANDLE 4mm HEX (max 2Nm)
If your headset is already installed and tight you do not need to adjust it.
If/when you need to tighten your headset use the same process as you would for a regular star nut installation. Loosen your stem steerer tube bolts then tighten the EDC Lite Bolt until you have the correct headset preload. Then re-tighten your stem steerer tube bolts.

TRAIL SIDE HEADSET TIGHTENING
If you need to tighten your headset when you are out riding, use the 4mm Hex on your EDC Tool. Tightening on trail will rotate the tool slot, as the plastic carrier will rotate with your EDC Tool. Extend the 4mm Hex on one side of the Multi Tool. On the other side of the tool extend all the tools and fold them down so that they are 90 degrees to the tool body to create a handle.

When you get home from a ride re-tighten with a long handled 4mm Hex so that you can correctly align the tool slot.
STEP 8: INSERT YOUR EDC TOOL AND EDC LITE TOOL CLIP.

HOW TO INSTALL THE EDC CLIP
The EDC Lite Tool Clip MUST be installed on to the Multi-Tool with the embossed arrow pointing towards the tooth on the side of the Flathead screwdriver. See picture below.

To easily remove your tool from the clip wiggle the tool as you pull the pieces apart.

Congratulations, you have now successfully installed your EDC Lite!
If you are having any problems please first double-check you have correctly completed each of the steps above. If you're still stuck please contact us, and we'll do our best to help!